SourceBoost IDE (Integrated Development Environment) is a low cost development environment for Microchip Inc. PIC and Ubicom Inc. SX processors. SourceBoost IDE includes a modern editor, a project manager, C, C++, and Pascal cross-compilers, a Project wizard, an assembler level debugger, a clock accurate simulator, and a number of virtual devices.
SourceBoost IDE was designed to be easy to work with. It usually takes only a few minutes from SourceBoost IDE installation to the point where compiled code runs on a target. Just remember that SourceBoost IDE works with projects and all source files you want to compile need to be included into a project. An easy way to start is to open one of the example projects included into SourceBoost installation.
Follow these steps to open and build an example project:
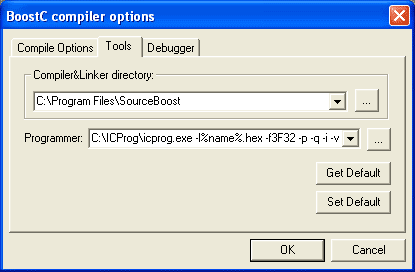
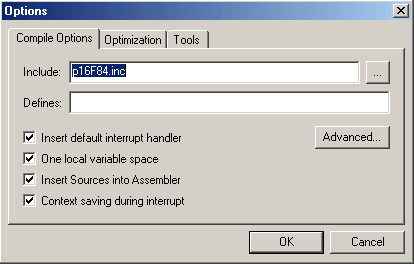
that will open the Options dialog, then go to the Tools page and verify that
the paths and command line options to the external tools are correct (See also
Building a Project - Assemble):
At this point the current project should have been built and the target processor programmed. It's now ready to test!

SourceBoost IDE has a number of different windows dedicated to perform some specific functions. All of these windows may be docked inside the main SourceBoost IDE window, or freely float at any part of the screen.
The SourceBoost IDE may work in two modes:
The windows that can be displayed and the layout of the windows is different for these modes. For example the Register and Stack windows are not visible in Edit mode, but can be displayed in Debug mode.
![]()
| Create a new document file. The created file will have no syntax coloring until it's been saved. | |
| Open an existing document file. | |
| Save the active document file. | |
| Save all modified document files. | |
| Cut selection. | |
| Copy selection. | |
| Paste content of the clipboard. | |
| Print the active document. | |
| Show/hide the Workspace window. | |
| Show/hide the Output window. | |
| Build the current project. This command starts the actions defined in the Build dialog. | |
| Compile the current project. | |
| Assemble the current project using the external assembler. If the external assembler is not specified this button is grayed out. | |
| Start an external programmer. If the external programmer is not specified this button is grayed out. | |
| Start an external simulator. If the external simulator is not specified this button is grayed out. | |
| Display SourceBoost IDE About dialog. | |
| Start built-in debugger. SourceBoost IDE enters the Debug mode. | |
| Toggle a breakpoint on the line under cursor. Breakpoints can be set only in assembly files. |
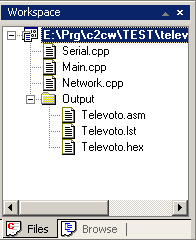
The IDE has a workspace window that can display either the Project files (that is the files a project is composed of), or a browser showing the various symbols used inside the Project files .
|
Files inside the Output folder are the output files generated
during compilation or assembly.
By default these are the files in the
project directory that have the same name as the project, but with
file extensions .asm, .lst and .hex. |
|
 |
SourceBoost IDE has a built-in browser that automatically builds a
database of symbols used in the current project. This data base gets updated every time a project is loaded or a file inside the project is changed. |
The Output window contains three pages:
The Build page is used to display various messages produced by SourceBoost IDE.
The Find page displays the results of the Find In Files command.
The Terminal page allows data to be transmitted to, and received from, a serial port.

This page displays compilation and assembly output, error and warning messages, and other information of interest to the user.

This page lists all files that are the result of the Find In Files command.

This is a serial port terminal. This page displays data received from a serial port, and allows data to be sent to a serial port.
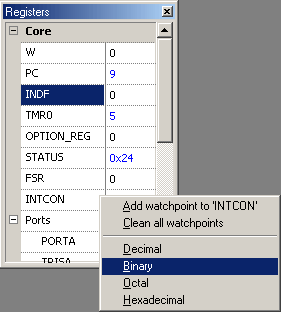 |
The register window shows registers for the current target. Based
on their functionality, the registers are partitioned into groups. This window functions only in debug mode and shows values of the target registers. The format of each value may be
changed using the right click menu. By default a register value is
displayed in black, but if it has changed since the last stop the
value becomes blue. To change the value click on it, enter a new one
and press Enter or click anywhere. |
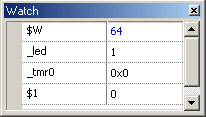 |
The watch window functions only in debug
mode and is used to display values of various symbols from the
debugged code. To add a new watch use the right click menu and select the Add... item. This will open the Quick Watch dialog where a new symbol to watch is specified. Similarly an already existing watch can be edited by selecting the Edit... item from the right click menu. A watch inside this dialog can be either entered or selected from the drop down list. |
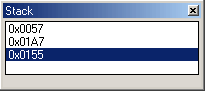 |
The stack window functions only in Debug mode and displays the content of the target hardware stack. |
 |
The memory window functions only in debug
mode and displays the register map of the current target. By default, register values are displayed in black, but if some have changed since the last stop their backgrounds become cyan. If a value was changed by the user its background becomes green. To edit the value of a register click on it, enter a new value, and press Enter or click anywhere. To add a watch to a register use the right click menu. A set watchpoint is indicated by a small red dot in the left top corner of a register value. Registers unimplemented for the current target have gray backgrounds. |
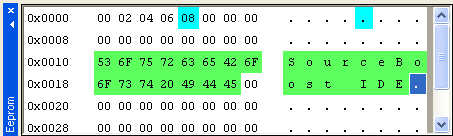 |
The eeprom window functions only in debug
mode and displays the eeprom map of the current target. By default eeprom values are displayed in black, but if some have changed since the last stop their backgrounds become cyan. If a value was changed by the user its background becomes green. To edit an eeprom value click on it, enter a new value, and press Enter or click anywhere. |
 |
The code window displays the project listing file (if it exists). In debug mode the execution line is displayed in this window as well as the relevant source window. In debug mode when the code window is active all step commands are done on assembly level. |
For toolsuites that generate call tree and code/memory usage data the code window will add
tabs to display this information:
|
Assembly mixed with sources. |
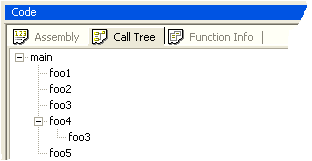
|
Program call tree. |
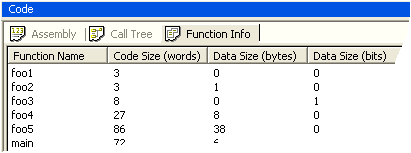
|
Code and memory usage by functions. |
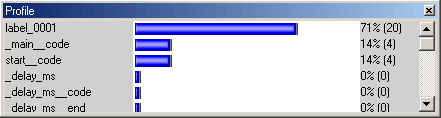 |
The profile window functions only in debug mode and displays, in graphical and numerical form, the number of times every assembler label was hit during execution. |
![]()
Status Bar displays various IDE status information such as current line and column, typing mode (insert or overwrite), number of clock cycles passed since the last reset, etc.
Edit mode is the default state of the SourceBoost IDE. SourceBoost IDE starts in the Edit mode. In this mode you can create or open projects, edit and compile code, start external tools, etc.
SourceBoost IDE works with projects. A project is a collection of source files, rules how these files should be compiled, and other information. Even if you need to build only one file, you first have to create a project that will contain this file. Fortunately SourceBoost IDE supports several easy and fast ways to create new projects.
The Quick project creation is used when a project contains only one source file. In this mode just a single source file is selected and a project that has the same name as this source file is created and opened inside SourceBoost IDE. Such a project gets created for the last selected target.
This is a conventional way to create a new project. After selecting the
directory where the new project should be created and the project name, an
empty project is created.
To add files to this project use the Add
file(s)... menu item in the Project menu or the right click menu of the
Workspace window.
In this mode a new project is created from a template selected in the Project Wizard. The created project is ready to be compiled and run on a target. Note: The project wizard is different depending on the toolsuite selected.
An existing project can be edited by adding or removing files from it.
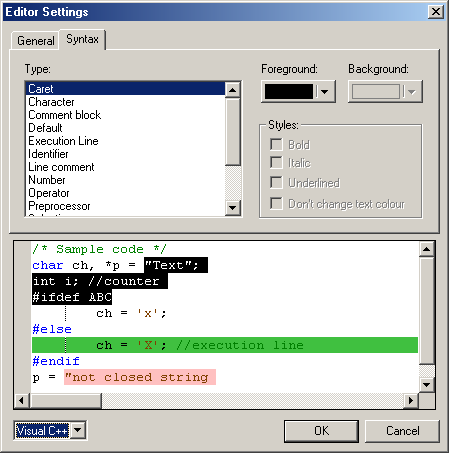
The editor has been designed to make code editing as easy as possible. It features customized coloring schemes, indentation lines, hot keys, drag and drop, virtually unlimited undo/redo, autocomplete, function prototype call tips, etc.
An open document file is colored based on its extension. Files with .C,
.CPP and .H extensions are colored by the SourceBoost IDE as C files. Files with
.ASM, .S and .LST extensions are colored as assembly files. All other files
are uncolored. The current syntax coloring scheme, font, and some other
editor parameters can be changed from the Editor settings dialog (
locate under main menu Setting ![]() Editor...).
Editor...).

|
|
|
Code editing becomes much more productive when using editor hot keys (combinations of keys that initiate various editor commands). SourceBoost IDE supports most of the standard, as well as some unique, editor hot keys. Some of them are listed below:
| Ctrl+Ins | Copy |
| Shift+Ins | Paste |
| Tab | Shifts current line or selection n symbols right |
| Shift+Tab | Shifts current line or selection n symbols left |
| Ctrl+F | Opens Find dialog |
| Ctrl+H | Opens Replace dialog |
| Ctrl+G | Opens Goto line dialog |
| Ctrl+Z | Undo |
| Ctrl+Y | Redo |
| Ctrl+Space | Autocomplete |
| Ctrl+Shift+L | Remove line under cursor |
| Ctrl+Shift+R | Record a macro |
| Ctrl+Shift+P | Play the last recorded macro |
| Ctrl+] | Move caret to the matching brace |
| Ctrl+Shift+G | Move caret to the last change position |
| Ctrl+Mouse Wheel | Change font size in the active window |
| F3 | Find next |
| Shift+F3 | Find previous |
Autocompletion is an editor mode which displays a list of possible symbols
for a partially typed symbol.
To activate the autocompletion mode press
Ctrl+Space. SourceBoost IDE will then scan its symbol browse database and display a
list of symbols that match a partially typed symbol.

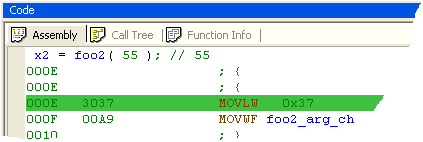
If a function with an existing prototype in a header file is being edited, a tooltip will show this function prototype with the current parameter highlighted :

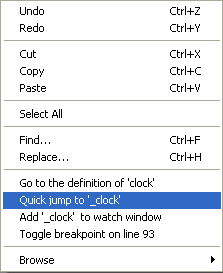
If there is a file name under the cursor, the right click menu will show an item to open this file in the editor.
When the caret is positioned right before a brace, this brace pair gets highlighted. Pressing Ctrl+] moves the caret to the matching brace.
If one of the source/header file pairs is edited, the right click menu will show the item Swap source/header to open this file pair.
To quickly navigate between different parts of a big file bookmarks can be used. Press Ctrl+F2 to set a bookmark on the current line. To jump to the next bookmark press F2, and to jump to the previous bookmark press Shift+F2.
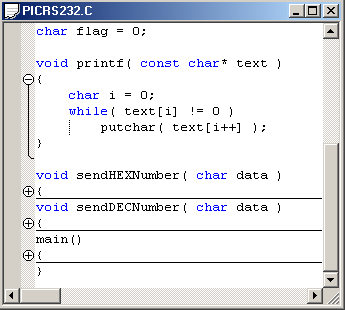
The Folding command collapses portions of the code to improve overall readability. The picture shows the rc232.c sample code with all functions except printf collapsed. Folding can be enabled or disabled in the Editor Settings dialog.
The right click menu of the source window contains many useful items that make your life easier:
Beside the standard operations like Copy and Paste, this menu allows:
SourceBoost IDE can work with different toolchains. The BoostC
C compiler, BoostC++ C++ compiler and BoostBasic Basic compiler compile code directly into a .HEX file and don't need any external tools.
The C2C-plus or C2C++ compilers compile C or C++ code into assembly language, and the P2C-plus
compiler compiles Pascal code into assembly language. Then this assembly language file needs
to be assembled into data (usually this is a .HEX file) that can be programmed into a target.
Because SourceBoost IDE doesn't include an assembler, an external one is required. Starting
from version 5.3, SourceBoost IDE also supports
PICC Lite compiler from
HI-TECH Software.
For the PIC target, recommended assemblers are MPASM that is a part of MPLAB from Microchip and GPASM that is a part of GPUTILS.
SourceBoost IDE does not include a device programming application either. There is no
recommended programmer software since almost all those available on the market can be used.
The only requirement for the external programming application is the ability to open an input
file passed from a command line parameter. A similar requirement exists for
an external simulator.
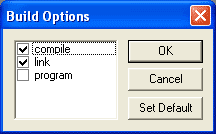
Build performs multiple operations from one action. This allows the compile, assemble, program, and simulate commands to be executed sequentially from one click of the build button. Only the operations checked in the Build dialog will be performed.
Staring from the version 5.2.2, SourceBoost IDE uses make to build a project. When the user issues a build command, SourceBoost IDE creates a makefile that contains rules enabled in the Build dialog, and then calls make. Make then compares the time stamp of the input and output files for each rule, and calls an action associated with a rule only if input files are newer than output files. Thus if a project was already compiled and its sources weren't changed, the build command will not compile it again.
The SourceBoost IDE debugger and simulator are invoked by pressing the debug button on the tool bar. |
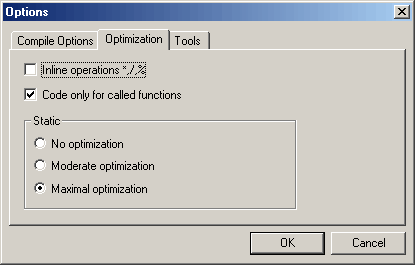
Compilation converts C or C++ code into an assembly file. The structure of
the generated assembly code depends on the compile and optimization options.
The default options will work for virtually any project, but sometimes it may
be useful to change the settings based on the project needs:
 |
 |
This command starts an external assembler using a command line specified in the Options dialog.
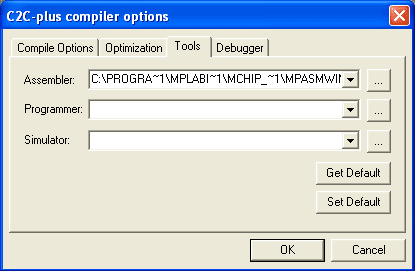 |
The C2C-plus, C2C++, and P2C-plus language toolsuites need
an external assembler to convert the assembly file that these compilers generate
into a hex file suitable to upload to a target. The most commonly used external
Assembler is MPLAB's MPASM. Assuming it is installed in the default location,
the command line options required for that assembler are:
C:\PROGRA~1\MPLAB\MPASMWIN.EXE /aINHX8M /p%target% /rHEX /w2 /q |
"C:\Program Files\MPLAB.6.30\MCHIP_Tools\MPASMwin.EXE" /aINHX8M /p%target% /rHEX /w2 /q |
This command invokes an external programmer application using a command line specified in the Options dialog.
JDM programmer: pp06 programmer: IC-Prog programmer: sxtips or sxdev programmer: PBrenner 3.2u programmer: Quasar Electronics All Flash USB programmer: Picall programmer: You may need to change the path to the programmer software. Don't forget to add double quotes around the programmer executable if the name or path to this executable contains spaces! |
This command starts an external simulator application using a command line specified in the Options dialog. The simulate command is not in any way related to the internal ide simulator that is used when code is being debugged.
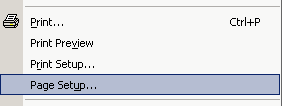
SourceBoost IDE features document printing accessible from the File menu:
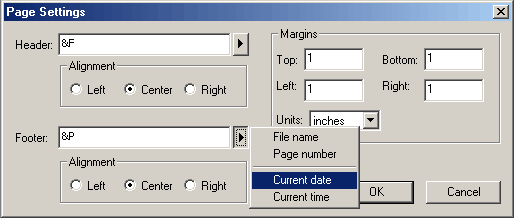
A printed document can have user-defined header and footer, and fully customized margins:
SourceBoost IDE has a built-in source and assembler level debugger and clock-accurate simulator. Stepping depends on the active toolsuite. The BoostC, BoostC++ and BoostBasic toolsuites support source level debugging. The PICC Lite toolsuite also supports source level stepping. The C2C-plus, C2C++, and P2C-plus toolsuites support assembly level stepping only.
A debug session is started by pressing the Debug button - See Tool Bar. This command starts the built-in debugger and simulator, loads the project .HEX file, resets the target, and loads the Debug mode window layout.
A debug session can also be started and stopped using hot keys:
| F5 | Start debug session and execute the program |
| F10 or F11 or F12 | Start debug session but don't execute the program. |
| Shift+F5 | Stop execution and exit debug session |
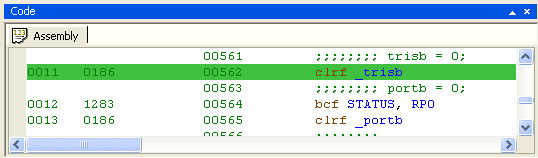
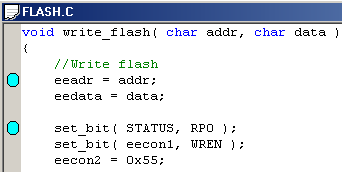
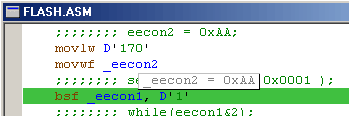
The execution line shows the position, in both source and code windows, that corresponds to the current PC (program counter). It is highlighted green:

![]()
The Debug bar is shown when SourceBoost IDE is in Debug mode. The buttons on the Debug bar are mapped to various debug commands:
| Step Over | The Step Over commands executes the current instruction. If the current instruction is a call instruction, the debugger doesn't step into this call but waits until the execution returns from this call. | ||
| Step Into | The Step Into commands executes the current instruction. | ||
| Step Out | The Step Out command executes instructions until a return from a call instruction gets executed. | ||
| Step Back | The Step Back command returns the target to the state when it was
stopped the previous time.
|
||
| Run | The Run command continues execution. | ||
| Stop | The Stop command stops execution. This command is active only when the target is running. | ||
| Reset | The Reset command resets the target. | ||
| Profile | The Profile command activates target profiling.
|
||
| Snapshot | The Snapshot command updates the Register, Memory, Stack and Watch windows. This command is active only in debug mode. |
Debug hot keys make debugging more efficient. Some of these hot keys duplicate the functionality of the buttons on the Debug Bar and some are unique:
| F5 | Continue code execution |
| Ctrl+F5 | Run code to the cursor (or the first breakpoint) |
| Shift+F5 | Exit debug mode |
| F10 | Step Over |
| Ctrl+F10 | Step Over on assembly level |
| F11 | Step Into |
| Ctrl+F11 | Step Into on assembly level |
| Shift+F11 | Step Out |
| F12 | Step Back |
A breakpoint can be added at any line of an .asm file that contains an
assembly language instruction.
Move the cursor to the line where a breakpoint is required, and press the
breakpoint button on the tool bar or press the F9 key.
Use the View menu or press Ctrl+B to open the Breakpoints dialog to see a list of existing breakpoints:

A watchpoint allows the execution of the program to be halted when a register changes in value. Watchpoints for registers can be set through either the Register window or the Memory window.
To quickly check the value of a symbol hold the mouse pointer over this symbol for more than 1.5 seconds. The symbol value will be shown in a tooltip near this symbol:
SourceBoost IDE features an extendable plugin system where each plugin emulates a physical device connected to the target. The standard SourceBoost IDE installation includes the following plugins:
 |
Single LED |
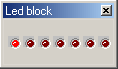 |
Block of 8 LEDs |
 |
Single button |
 |
Block of 8 buttons |
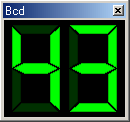 |
7 segment and 12 segment Display with decoding |
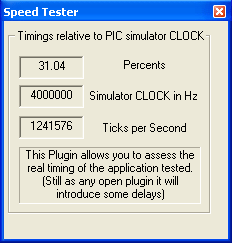 |
Speed Tester plugin to measure code execution speed |
| Digital Volt Meter Signal generator Logic Analyzer I2C EEprom Stop Watch LCD Display Analog Voltage Source |
Part of SourceBoost IDE Extra plugins package ( http://www.sourceboost.com/Products/Products.html) |
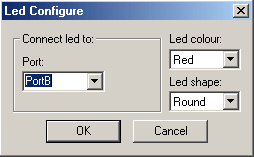
Every plugin is connected to a target port, and when the target is running each plugin changes its state based on the changes of the port it is connected to. The port value can also be changed by a plugin (for example the button plugin changes the value of the pin it is connected to).
To change the port a plugin is connected to, or plugin settings (i.e. colours), use the plugin right click menu that will display a plugin Configuration dialog:
Some plugins depend on the simulation clock rate that can be changed in the
Clock Rate dialog accessible from the Settings ![]() Clock Rate... menu:
Clock Rate... menu:

For more information and descriptions of additional plugins, refer to the Plugin System help file.
The latest SourceBoost IDE PIC16 and PIC18 simulators now support simulation of the following special registers and hardware functions of PIC microcontrollers:
Instruction Core - Including:
Interrupt Control - Including:
EEPROM - Full implementation, including:
A/D converter - only PIC16F877A and compatible types, ie PIC16C925, PIC16C926, PIC16F818, PIC16F819, PIC16F870, PIC16F871, PIC16F872, PIC16F873, PIC16F873A, PIC16F874, PIC16F874A, PIC16F876, PIC16F876A, PIC16F877, PIC16F877A. Other devices with A/D Convertor are not supported.
A/D Convertor Features:
Timer1 - 16 bit timer/counter, including:
Timer2 - 8 bit timer/counter, including:
CCP1 and CCP2 - Capture and Compare 1 and 2, including:
PortA - General purpose I/O port. Full I/O port implementation including:
PortB - General purpose I/O port. Full I/O port implementation including:
PortC - General purpose I/O port. Full I/O port implementation including:
PortD - General purpose I/O port. Full I/O port implementation
PortE - General purpose I/O port. Full I/O port implementation
PortF - General purpose I/O port. Full I/O port implementation
PortG - General purpose I/O port. Full I/O port implementation
Simulator Limitations
Instruction Core - Including:
Interrupt Control - Including:
Timer0 - timer/counter, including:
PortA - General purpose I/O port. Full I/O port implementation including:
PortB - General purpose I/O port. Full I/O port implementation including:
PortC - General purpose I/O port. Full I/O port implementation
PortD - General purpose I/O port. Full I/O port implementation
PortE - General purpose I/O port. Full I/O port implementation
PortF - General purpose I/O port. Full I/O port implementation
PortG - General purpose I/O port. Full I/O port implementation
Simulator Limitations
SourceBoost IDE was designed to be independent from the toolsuites it uses as much as possible. Each such toolsuite consists of a DLL with a well defined API. Though this API is not publicly available, we are open for cooperation should you decide to integrate your toolsuite into SourceBoost IDE.
In the SourceBoost IDE package the ide, debugger, and simulator are logically and physically separated and communicate with each other through well defined APIs. Such separation makes the whole system extremely flexible for future extensions. For example, adding ICD support to SourceBoost IDE will only require replacing the simulator DLL with another DLL that implements simulator API from one side and talks to ICD hardware from another; the ide and debugger would be unchanged. Another example is the integration of the gnu toolchain (gcc, gdb, etc.) into SourceBoost IDE. This will require replacing the debugger DLL with a DLL that talks to gdb and writing a toolsuite DLL that will manage the gcc compiler. Though these APIs are not publicly available, we are open for cooperation should you decide to integrate your tools into SourceBoost IDE.
The SourceBoost IDE installation includes a sample project for
PICC Lite compiler.
The project is located in the Samples\Picc.Lite sub-directory in the directory where
SourceBoost IDE is installed (the default SourceBoost IDE installation directory is
C:\Program Files\Picant).
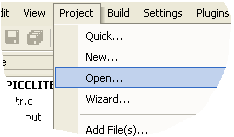
Go to the Project![]() Open... menu:
Open... menu:
and navigate to the directory where SourceBoost IDE is installed and then to its Samples\Picc.Lite sub-directory:
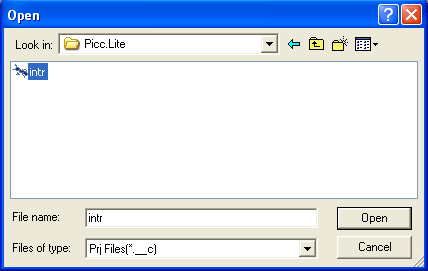 .
When the project is open verify that the
PICC Lite toolsuite is selected.
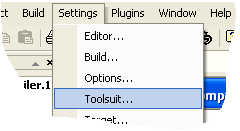
Go to the Settings
.
When the project is open verify that the
PICC Lite toolsuite is selected.
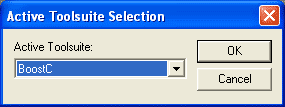
Go to the Settings![]() Toolsuite... menu:
Toolsuite... menu:
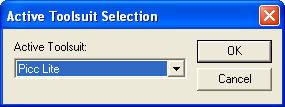
and select the Picc Lite Toolsuite:
Then make sure that IDE knows where to look for the
PICC Lite compiler.
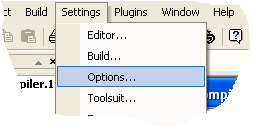
Go to Settings![]() Options... menu:
Options... menu:
select the Tools page in the Picc Lite compiler options dialog and enter the full path to the PICC Lite compiler in the Compiler field:

That's it. Now you are ready to edit, build, and debug your project.
SourceBoost IDE, C2C-plus, C2C++ and P2C-plus compilers are distributed as shareware products with a trial period (usually 15 days) to try these applications. After the trial period expires only one target will remain supported. To unlock other targets a compiler license must be obtained.
Limited versions of the BoostC, BoostC++ and BoostBasic compilers can be used for non commercial purposes without any license. To remove limitations and to be able to use them in commercial projects relevant license must be obtained.
To order a license visit http://www.sourceboost.com or send an e-mail to support@sourceboost.com. After your payment is recieved an e-mail will be sent to you with a key and description how to unlock the product.
THERE IS NO WARRANTY FOR THE PROGRAM, TO THE EXTENT PERMITTED BY APPLICABLE LAW. EXCEPT WHEN OTHERWISE STATED IN WRITING THE COPYRIGHT HOLDERS AND/OR OTHER PARTIES PROVIDE THE PROGRAM "AS IS" WITHOUT WARRANTY OF ANY KIND, EITHER EXPRESSED OR IMPLIED, INCLUDING, BUT NOT LIMITED TO, THE IMPLIED WARRANTIES OF MERCHANTABILITY AND FITNESS FOR A PARTICULAR PURPOSE. THE ENTIRE RISK AS TO THE QUALITY AND PERFORMANCE OF THE PROGRAM IS WITH YOU. SHOULD THE PROGRAM PROVE DEFECTIVE, YOU ASSUME THE COST OF ALL NECESSARY SERVICING, REPAIR OR CORRECTION.
IN NO EVENT UNLESS REQUIRED BY APPLICABLE LAW OR AGREED TO IN WRITING WILL ANY COPYRIGHT HOLDER, OR ANY OTHER PARTY WHO MAY MODIFY AND/OR REDISTRIBUTE THE PROGRAM AS PERMITTED ABOVE, BE LIABLE TO YOU FOR DAMAGES, INCLUDING ANY GENERAL, SPECIAL, INCIDENTAL OR CONSEQUENTIAL DAMAGES ARISING OUT OF THE USE OR INABILITY TO USE THE PROGRAM (INCLUDING BUT NOT LIMITED TO LOSS OF DATA OR DATA BEING RENDERED INACCURATE OR LOSSES SUSTAINED BY YOU OR THIRD PARTIES OR A FAILURE OF THE PROGRAM TO OPERATE WITH ANY OTHER PROGRAMS), EVEN IF SUCH HOLDER OR OTHER PARTY HAS BEEN ADVISED OF THE POSSIBILITY OF SUCH DAMAGES.
THE AUTHOR RESERVES THE RIGHT TO REJECT ANY LICENSE (REGISTRATION) REQUEST WITHOUT EXPLAINING THE REASONS WHY SUCH REQUEST HAS BEEN REJECTED. IN CASE YOUR LICENSE (REGISTRATION) REQUEST GETS REJECTED YOU MUST STOP USING THE SourceBoost IDE, BoostC, BoostC++, BoostBasic, C2C-plus, C2C++ and P2C-plus COMPILERS AND REMOVE THE WHOLE SourceBoost IDE INSTALLATION FROM YOUR COMPUTER.